Monday, July 4, 2011

Canning Tomato Sauce

I decided today that I had enough ripe tomatoes to finally do my first batch of canning tomato sauce this season, so that's what I spent the better part of the day doing.  I got the recipe here.


My modifications:
--30 lbs of tomatoes instead of 20
--less onion because I used up the last of what I had
--dried basil instead of fresh because I didn't have any fresh
--did not remove seeds or skin
--reserved the juice after simmering for a couple of hours to use as soup because it was taking forever to boil down

Whole tomatoes with the bad parts cut out:  about 29 lbs total.


Sauteeing the garlic and onion in olive oil


Cutting the tomatoes into large chunks


Simmering tomatoes to cook them slightly and get the skins to come off.


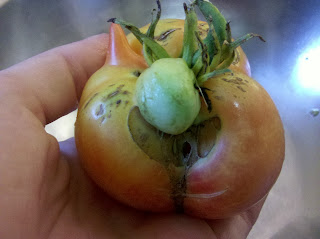
A little gremlin tomato with a horn LOL


Simmering a little more


Before food processing


After food processing


Finished product:
3 quarts and 3 pints sauce
5 pints soup


Monday, June 13, 2011

Hive Inspection 6/13/11

I just got done with my hive inspection for the day, and it pretty much turned into a disaster at the end.

After lifting the roof off of the hive, I spotted 4 SHB scurrying around and killed them before they could escape (but this was not the bad part).  I started lifting bars up on the far right end to see how much progress they had made and if I needed to expand the hive out.  All of the bars were full of comb, so I took out the follower board on the right and added 3 more bars.  Then I had to shift all of the comb to the left  and move a couple of the empty bars from that side over to the right.  I found a good sized clump of drone cells on the far left of the hive and no queen cells... very glad to not have queen cells.  I saw the queen a couple of times as I pulled the bars out since she was moving around among them.  The disaster happened when I got to the last 2 or 3 bars that they had built comb on. They had comb built slanted across the joint of 2 bars, and when I pulled the first one out, the comb that was partially attached slowly detached and folded over into the bottom of the hive.  Not only were there casualties from bees getting crushed, but the entire comb was filled with capped brood.  It was extremely upsetting for me and the bees.  I then had to reach my (thankfully gloved) hand down into the hive and retrieve it with no choice but to destroy the comb.  Had it been honey, I could have just harvested it and not felt so horrible about it.  I then put the comb into a bowl and had to cut it out in small chunks and walk away with it because every time I tried to brush them off, they landed right back on it again.  After I finally finished all of that up and replacing the empty bars and putting the cloth back on top, I was getting ready to walk away and one of the workers crawled up my pant leg and stung me on my ankle.

They now have access to a 3rd entrance hole to the hive, and about 6 more bars to build comb on before I have to think about possibly splitting the hive.  I sure wish this inspection had gone better!  *sigh*  Rough day in the bee yard today  ='(

More garden and trailer updates 6/13/11

I haven't had too much time to work on the blog lately.  I did more overtime than usual last week so I could have a little extra money for my vacation coming up.  A good chunk of my free time was spent prepping for that.  I feel like I finally made some progress with that today.

It finally rained last Thursday after a couple of hot, dry weeks, so the plants were really appreciative of it.  I finally got a chance to look at the garden on Saturday morning to find all kinds of fun things that had a nice growth spurt thanks to the rain.  Since I had been getting way more daylilies out of the garden than I really knew what to do with, I decided to try to dehydrate some on the back porch under a double pane sheet of glass that I had picked up at the recycling center last year in hopes of turning into a real solar dehydrator.  All I did was prop it up with 2x4 lumber in order to give it enough space to put the trays underneath.  It worked well for just drying flower petals.  I don't necessarily think that it would work on thicker things like vegetables though.


Daylilies dehydrating on the back porch

Eggplants very close to picking.  They're Ichibans so they don't get as wide as the eggplants you see in the grocery store.

This tomato is as big as my hand and doesn't seem to be showing any signs of blushing anytime soon.

I love the little oddities on the fruit of heirloom varieties.  The tomato on the left has some spiky growth on the top of it =)

I know I need to do some SERIOUS weeding, but the broccoli and cauliflower plants are both doing well.

Saturday's harvest after a nice rain 2 days before:  6 cucumbers, 2 zucchini, 13 daylilies, and a 1/2 lb of blackberries!


Eric also did a lot of work on redoing the bottom and sides of the trailer while I was at work last week.  He is probably about 75% finished with it.  The only things left are one of the sides, the gate at the back, remounting the trailer lights, and mounting the spare tire.  I had to buy a little extra lumber today to finish it off since we didn't have quite enough scrap lumber, so he should be able to take care of that this week.  He's doing a great job with it.  I probably won't blog very much (if at all) this week since I still have lots of prep work to do before vacation.  I'm very excited!


"New" decking from scrap lumber that came off of an old porch we disassembled.

Monday, June 6, 2011

Baby Eggplants

I woke up with my squash bed looking sad, presumably from heat stress and the damage already caused by pest insects.  We REALLY need some rain here!

I finally have baby eggplants =)

2 baby eggplants

Concord grape vine after about 6 weeks in the ground.

Sunday, June 5, 2011

Fried Daylilies

Last year I discovered that daylilies were edible (after having them in my garden for about 4 years), but I hadn't done anything with them other than picking and eating them fresh in salads.  I picked a few flowers yesterday and refrigerated them to wait for a few more to bloom.  I had 10 flowers today, so I decided to make some fried daylily blossoms.  They were quite interesting to try.  A friend asked me if the taste was describable.  I told her that it had the texture of an onion ring but with a plain batter taste and the flower itself was just slightly sweet.  Overall the first batch was mostly bland, but now I know that I can modify the recipe for future batches.  I have lots more daylilies waiting to bloom.

I found the recipe here.

Fresh daylilies and prepared batter.

Frying daylily.  I cooked them one at a time so I wouldn't get distracted and none would burn.

Finished product.


Daylily Nutrition Facts (fresh from the plant):
Per 100 grams
(per 100g)
Hemerocallis fulva

Calories:  42
Protein:  2g
Fat:  .4g
Calcium:  87mg
Phosphorus:  176mg
Iron:  1.2mg
Sodium:  24mg
Potassium:  170mg
Vitamin A:  3,000 I.U.
Thiamin:  .16mg
Riboflavin:  .21mg
Niacin:  .8mg
Vitamin C:  88mg


Garden & Trailer Update 6/5/11

I did just a little bit of general gardening today.  The heat here has been so unrelenting lately that I haven't really wanted to get outside in the middle of the day to really take care of what needs to be taken care of.  One thing I decided that really needed to be done was spraying the squash/cucumbers with neem oil.  I haven't used it before, but I read about it in the latest issue of Mother Earth News, so I decided to try it out.  I've been doing the hand picking for squash bugs, cucumber beetles, etc. but I think a couple of plants had gotten attacked by squash vine borers.  I hope the neem oil will help the situation.


Tomato bed from the top of the driveway.

Tomato bed from the bottom of the driveway.

Tomato bed from the neighbor's driveway, which I rarely look at the house from.

Beautiful, bushy tomato rows.

More bushy plants with a couple of young tomatoes.

Squash/Cucumber bed.


Eric and I also took a trip to Lowe's for hardware to rebuild the trailer.  We're using old pressure-treated decking from a porch we took apart one or two summers ago.  While I took care of gardening and cooking/cleaning inside, Eric took the old planks and plywood off of the trailer, and we moved it to the backyard.


Saturday, June 4, 2011

Camp Kitchen

After very much debating in my head whether to finally get this thing or not, I at last decided to order a camp kitchen to take to PSG.  It's the deluxe model from Cabela's.  Since it was on sale for $40 cheaper, and they had a special on shipping, I finally went for it.  This has been a purchase I've wanted to make for at least 2 years now.  Hopefully it will be worth it because I've heard nothing but good reviews about it.  I shouldn't have any problems with it arriving on time.  I probably would have gotten the standard model if it hadn't said that it ships in 2-3 weeks on the website.

Wednesday, June 1, 2011

First Picked Zucchinis!


I picked my first 3 zucchinis today weighing in at 1 lb 10.2 oz. total.

I've gotten around 1 lb of blackberries from the bushes out front so far.  The thornless Arapaho blackberries that I bought at Lowe's last year certainly have larger berries, but the wild ones that were already in place are producing quite a few of the smaller berries as well.


Leaf Lettuce

Beautiful butterfly in the lilies

Monday, May 30, 2011

Hive Inspection 5/30/11

After my failed attempt at trying to inspect the hive last time, I decided to get on the internet and order some more beekeeping supplies (smoker, coveralls, gloves).  I got suited up and went out to check out the bees to see what was going on.  I had thought that maybe something was wrong with them because they had become so defensive since the other 2 inspections I had done.  It turns out there didn't seem to be anything wrong afterall.  I found the queen on the first bar I pulled out of the hive, so that wasn't the problem.  After concluding the inspection I decided that maybe they were being extra defensive because of the sheer population increase or the fact that they now have a ton of stored honey and pollen that they're trying to defend.  The inspection went pretty well even though they were still being defensive.  Since I was covered from head to toe, I didn't get stung at all this time.

A couple of things that I discovered this time around:

1.  As soon as I pulled the roof off of the hive, I saw one SHB scurrying around, but as soon as I saw it, the workers were chasing and trying to sting it.  It is the only SHB I saw on my inspection... no infestations or anything, which I thought might have been agitating them.
2.  It appears that they are turning hatched brood comb into honey and pollen comb after the bees emerge and the cells are cleaned.
3.  Since the bees are currently occupying the middle of the hive, with the follower boards on both sides, they are expanding to the right where the empty bars are.  Since they came with only one honey comb (which was placed on the left), and 4 brood combs, as each comb of brood hatched out, the brood moved to the right where the new comb was being made.
4.  After pulling out all of the bars that had comb, I found 7 bars with honey and pollen, but 2 of the bars had 2 rows of comb, so it turned out to be about 8 1/2 combs of honey and pollen (some capped, some not).
5.  The first natural comb that they built was made into honey, but they added a very clear dividing line and  extended it down where brood was then laid (there are pics).
6.  I didn't really see any drones while I was inspecting.  I guess I wasn't looking too hard for them either though.  I'll have to make a point to do that next time.


There's my queen, in the middle of the first bar I pulled out.  (Look for the white dot on her thorax)

Newest bar of full, natural comb with brood in it.


Back side of the brood comb in the previous picture.

The empty slot is where the comb in the previous picture belongs.

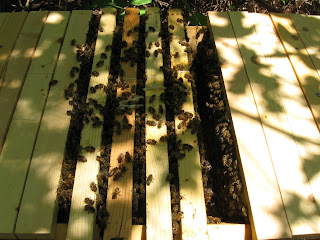
I love pictures with the bees just spilling out everywhere.

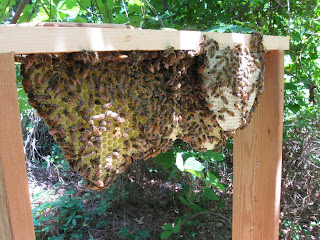
New, unfinished comb that the bees are working on now.  I'm not really a fan of how they're putting 2 rows of comb on one bar.  It makes inspections much more difficult, but I'm not destroying the comb.

Capped honey comb, previously brood comb.  I could feel a big difference in the weight of it when I lifted it out of the hive.


Bees everywhere =)

You can see the workers starting a bee chain on the extended part of comb.

The comb with the division between uncapped honey and brood.  The extension on the bottom is the brood.

Back side of the comb in the previous photo.  This bar also has 2 rows of comb on it.